How To Grow Your Email List Fast From Zero To 10,000 Subscribers Using 3 Free Tools
TL;DR: You can grow your email list from zero to 10,000+ subscribers per month using three free tools: click triggers, welcome mats, and exit-intent popups. One ecommerce brand collected 140,646 email subscribers and 6,573 direct sales from a single popup. The average popup converts at 3.09%, but gamified popups hit 10-24% conversion rates. Here is the exact playbook, with specific configurations and compounding math that shows why starting today (even with zero subscribers) matters more than you think.
In This Post You’ll Learn
- The compounding math that turns 0 subscribers into 10,000+ per month
- How one popup generated 140,646 subscribers and 6,573 sales on autopilot
- Exact popup configurations that convert at 10-24% (vs. the 3.09% average)
- The 3-tool stack that grew a blog from 3,000 to 10,000 emails per month
- A step-by-step setup guide you can finish this afternoon with zero budget
The Compounding Math Behind Email List Growth
Most people think email list growth is linear. You add 50 subscribers this week, 50 next week, and in a year you have 2,600.
That is the slow version.
Here is what ACTUALLY happens when you set up the right capture tools and let them compound.
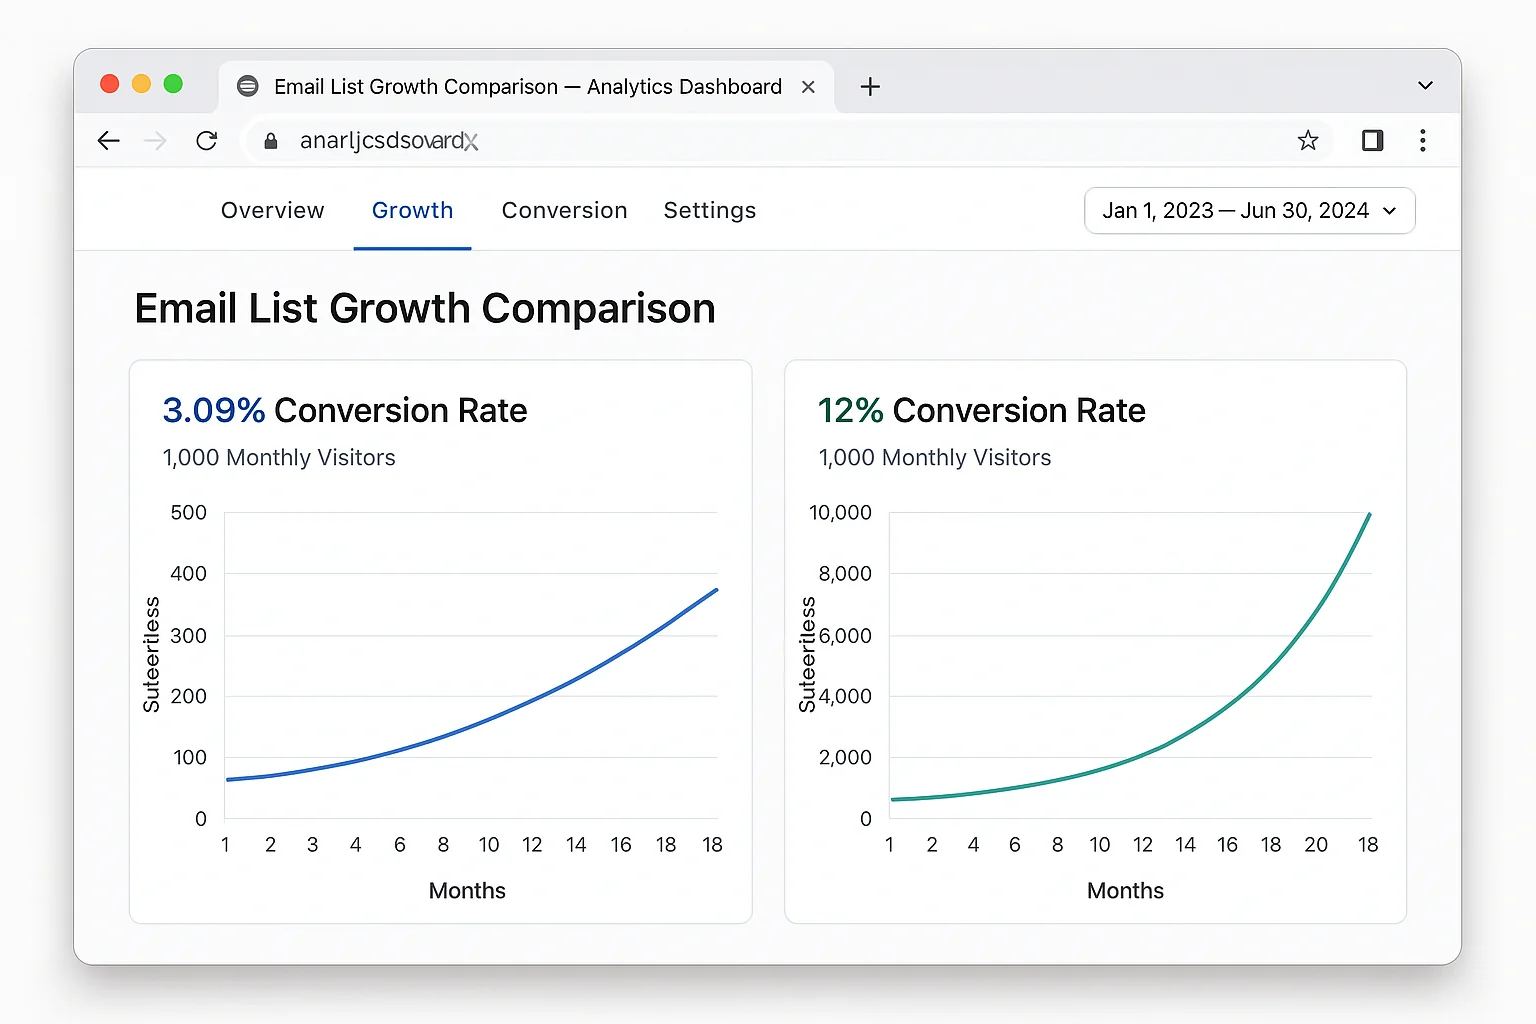
Let’s say your website gets 1,000 visitors per month and you install a popup that converts at 3.09% (the industry average according to Sumo’s research across nearly 2 billion popups). That is 30 new subscribers in month one.
Now those 30 subscribers start sharing your content. Your SEO starts compounding. Your traffic grows 10% month over month (a conservative number for a site actively publishing content).
By month 6, you are collecting 49 subscribers per month. By month 12, you are at 86. By month 18, you are over 150. And that is with a below-average conversion rate on modest traffic.
But here is where it gets interesting…
Swap that 3.09% popup for a gamified popup converting at 12%. Same traffic. Same 10% monthly growth. By month 12, you are collecting 334 subscribers per month. By month 18, you are north of 580.
The difference between a basic popup and an optimized one is not 4x over a single month. It is the compounding effect of that 4x advantage over 12, 18, 24 months.
That gap turns into thousands of subscribers. And those subscribers turn into revenue.
The math is brutal if you wait. Every month you delay setting up proper email capture, you are not just missing that month’s subscribers. You are missing the compounding effect of every subscriber you would have gained from that point forward.
The takeaway: Email list growth is exponential, not linear. The best time to set up your capture tools was 6 months ago. The second best time is today.
The Popup That Generated 140,646 Subscribers And 6,573 Sales
Fanchest is an ecommerce sports gift box company. They sell themed gift packages for fans of NFL, NBA, MLB, and NHL teams.
Their entire email acquisition strategy comes down to one thing.
One popup.
A visitor lands on any product page. After 10 seconds, a popup appears offering a discount on their first purchase. The visitor enters their email to claim the discount.
That is the whole strategy. No 17-step email funnel. No complex segmentation logic. No retargeting pixel witchcraft.
Here is what that single popup produced:
- 140,646 email subscribers collected on autopilot
- 6,573 direct product sales from the popup discount alone
- A conversion rate that crushed their previous opt-in forms
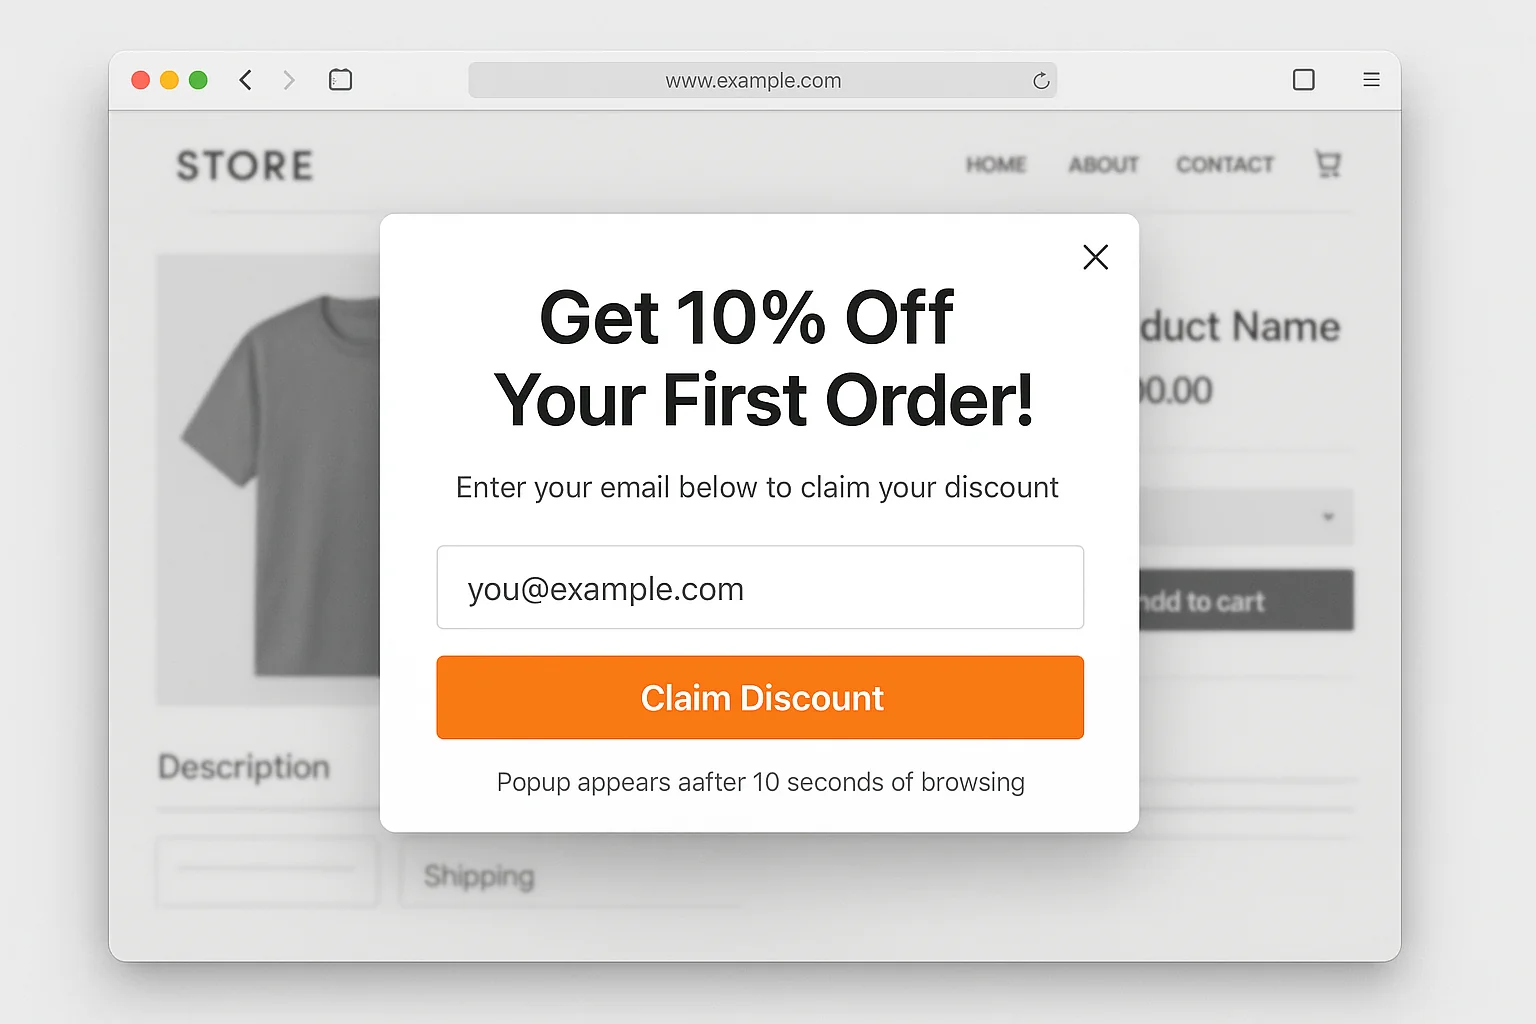
The reason it works is laughably simple. A first-time visitor who is browsing products already has buying intent. Offering them a discount at the exact moment they are considering a purchase removes the last friction point. They give you their email AND buy the product.
And the best part? Every subscriber who does not buy immediately enters an email sequence that brings them back. Fanchest’s popup is both an acquisition tool and a revenue generator, running 24 hours a day without anyone touching it.
Compare this to what most businesses do. They bury a tiny email signup form in the footer of their website. A form that maybe 0.5% of visitors ever notice, let alone fill out. Then they wonder why their list is not growing.
The takeaway: One well-timed, well-positioned popup outperforms every passive signup form on your entire website. Combined. The Fanchest popup proves that simplicity scales.
Gamification: The Conversion Multiplier Nobody Talks About
The average popup converts at 3.09%.
A good popup, with strong copy, clear value, and proper timing, can hit 5-7%.
But gamified popups operate in a completely different league.
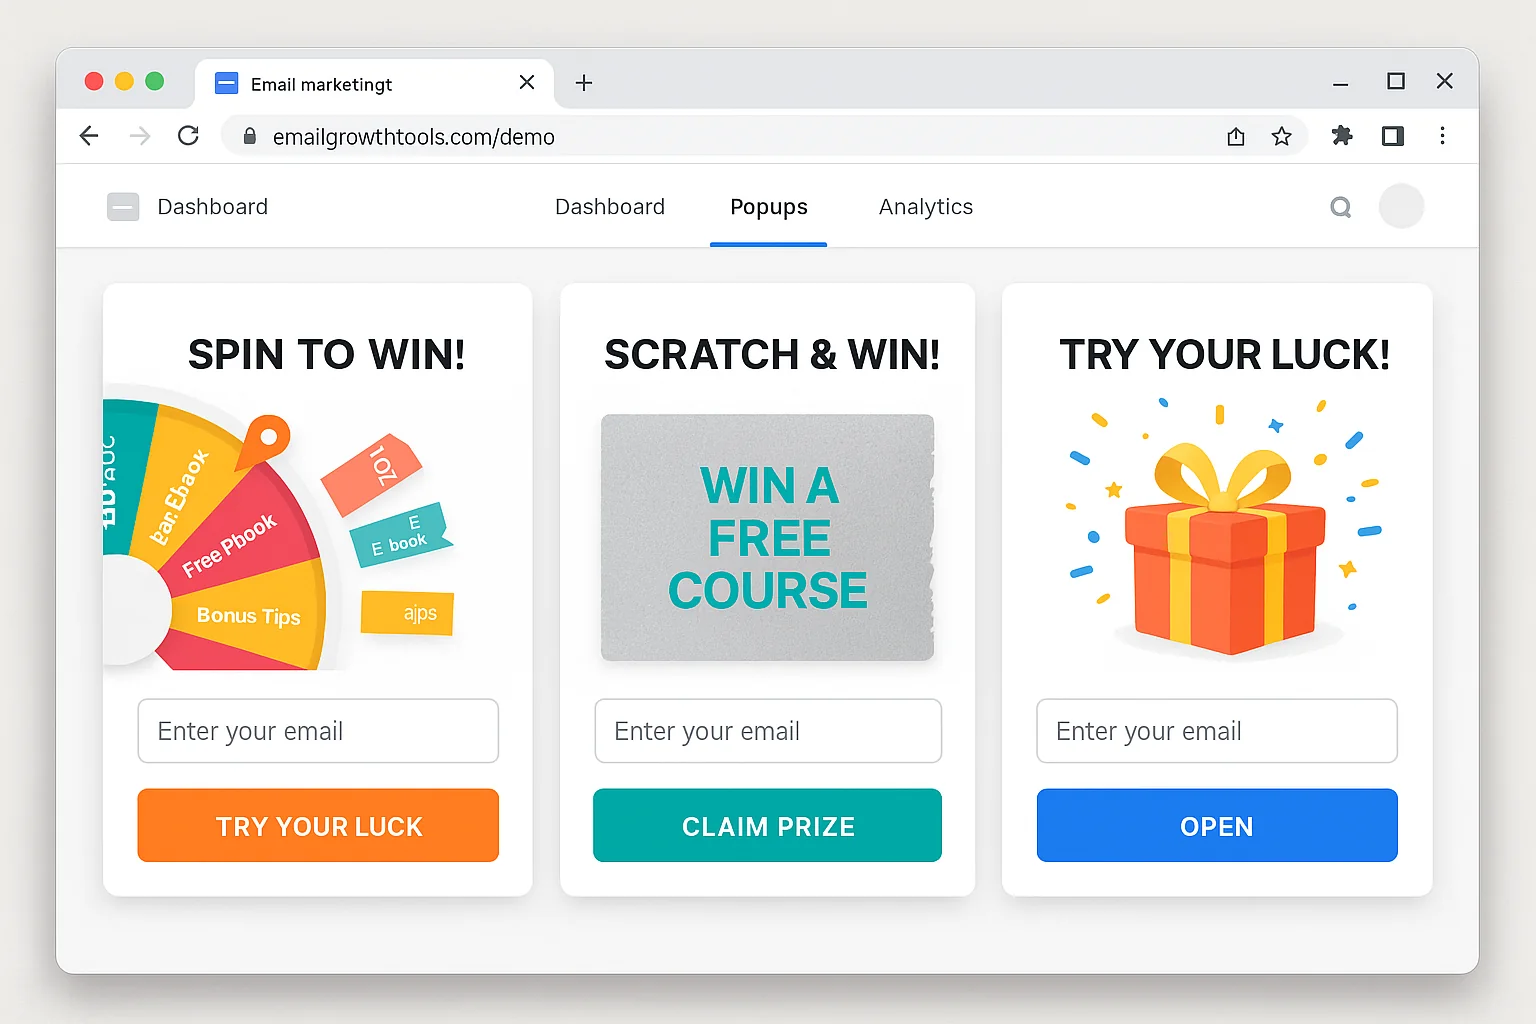
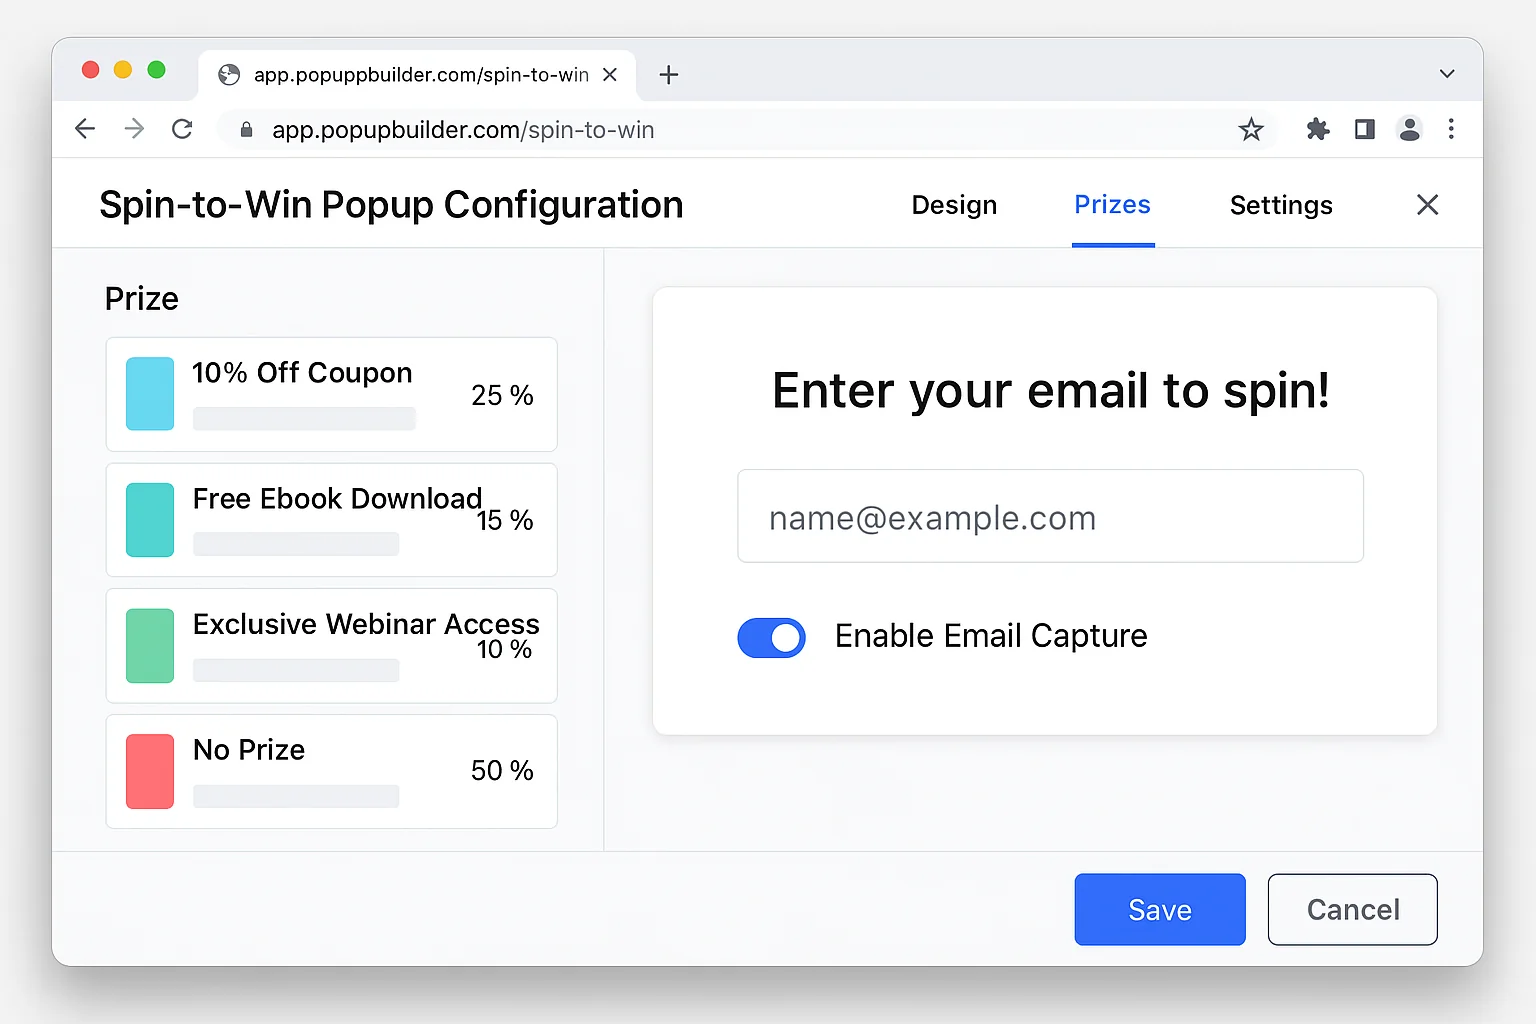
Sumo (now BDOW) ran their “Cart Casino” promotion. It was a spin-to-win popup where visitors could spin a virtual wheel to win discounts ranging from 30% to 50% off.
The result? A 24.90% conversion rate and 9,055 email opt-ins in 24 hours. Those opt-ins converted into $129,526.20 in annual recurring revenue. In ONE day.
That is not a typo. A gamified popup converted at nearly 8x the industry average.
And Sumo is not an outlier. Research from OptiMonk shows that gamified popups consistently convert between 10% and 24%, depending on the offer and implementation.
Here is why gamification works so well. Standard popups ask visitors to make a rational decision: “Is this ebook/discount/newsletter worth giving up my email?” The visitor weighs the pros and cons and, more often than not, clicks away.
Gamified popups bypass that rational evaluation entirely. The act of spinning a wheel or scratching a card triggers the same dopamine response as a slot machine. The visitor is no longer evaluating an offer. They are playing a game. And to play, they need to enter their email.
The three gamification formats that convert highest:
- Spin-to-win wheels (10-24% conversion). The visitor spins a virtual wheel with multiple prize tiers. Every spin wins something, but the prize varies. This is the most tested and proven format.
- Scratch cards (8-18% conversion). The visitor “scratches” a virtual card to reveal their discount. Simpler than a wheel, but the reveal mechanic still triggers curiosity and dopamine.
- Pick-a-box (7-15% conversion). The visitor chooses between 2-3 mystery boxes. Each contains a different offer. The choice element adds engagement.
Here is the configuration that matters most for gamified popups.
Every spin must be a winner. If visitors can “lose,” you destroy the goodwill instantly. The psychology works because there is zero risk to the player. The variation is in how much they win, not whether they win.
Set up your prize tiers like this:
- 60% chance: smallest discount (10-15% off)
- 25% chance: medium discount (20-25% off)
- 10% chance: large discount (30-40% off)
- 5% chance: grand prize (50% off or free item)
This weighting means most visitors get the smaller discount (protecting your margins), but the possibility of the grand prize is what drives them to play.
The takeaway: Gamified popups convert 3-8x higher than standard popups because they shift the interaction from rational evaluation to emotional gameplay. If you are still using a static “Enter your email” box, you are leaving subscribers on the table.
The 3-Tool Stack That Collects 10,000 Emails EVERY Month
The Sumo/BDOW blog went from collecting 3,000 emails per month to 6,000 in four months. Then they kept optimizing and hit 10,000+ per month.
They did it with three free tools. No paid ads. No influencer partnerships. No complicated funnels.
Here is exactly what those three tools are and how they work together.
Tool #1: Click Triggers (The #1 Email Source)
A click trigger is a hyperlink inside your blog content that opens a popup when clicked. The popup offers a “bonus upgrade” directly related to the content the visitor is already reading.
For example, if your blog post is about Instagram hashtag strategies, the click trigger offers a “Free Download: 500 High-Performing Instagram Hashtags By Niche” bonus.
The key is placement. BDOW’s testing revealed that four specific link positions maximize click-through:
- Directly under the headline as “Bonus: [Download/Checklist/Template]”
- In the top 30% of the blog post, woven naturally into the content
- In the bottom 30% of the blog post, right as the reader is finishing
- Inside the core content, where it is most contextually relevant
The reason click triggers outperform every other method is intent. A visitor who clicks a link to download bonus material is actively raising their hand. They have self-selected as someone who wants more. That is the highest-intent email capture you can build.
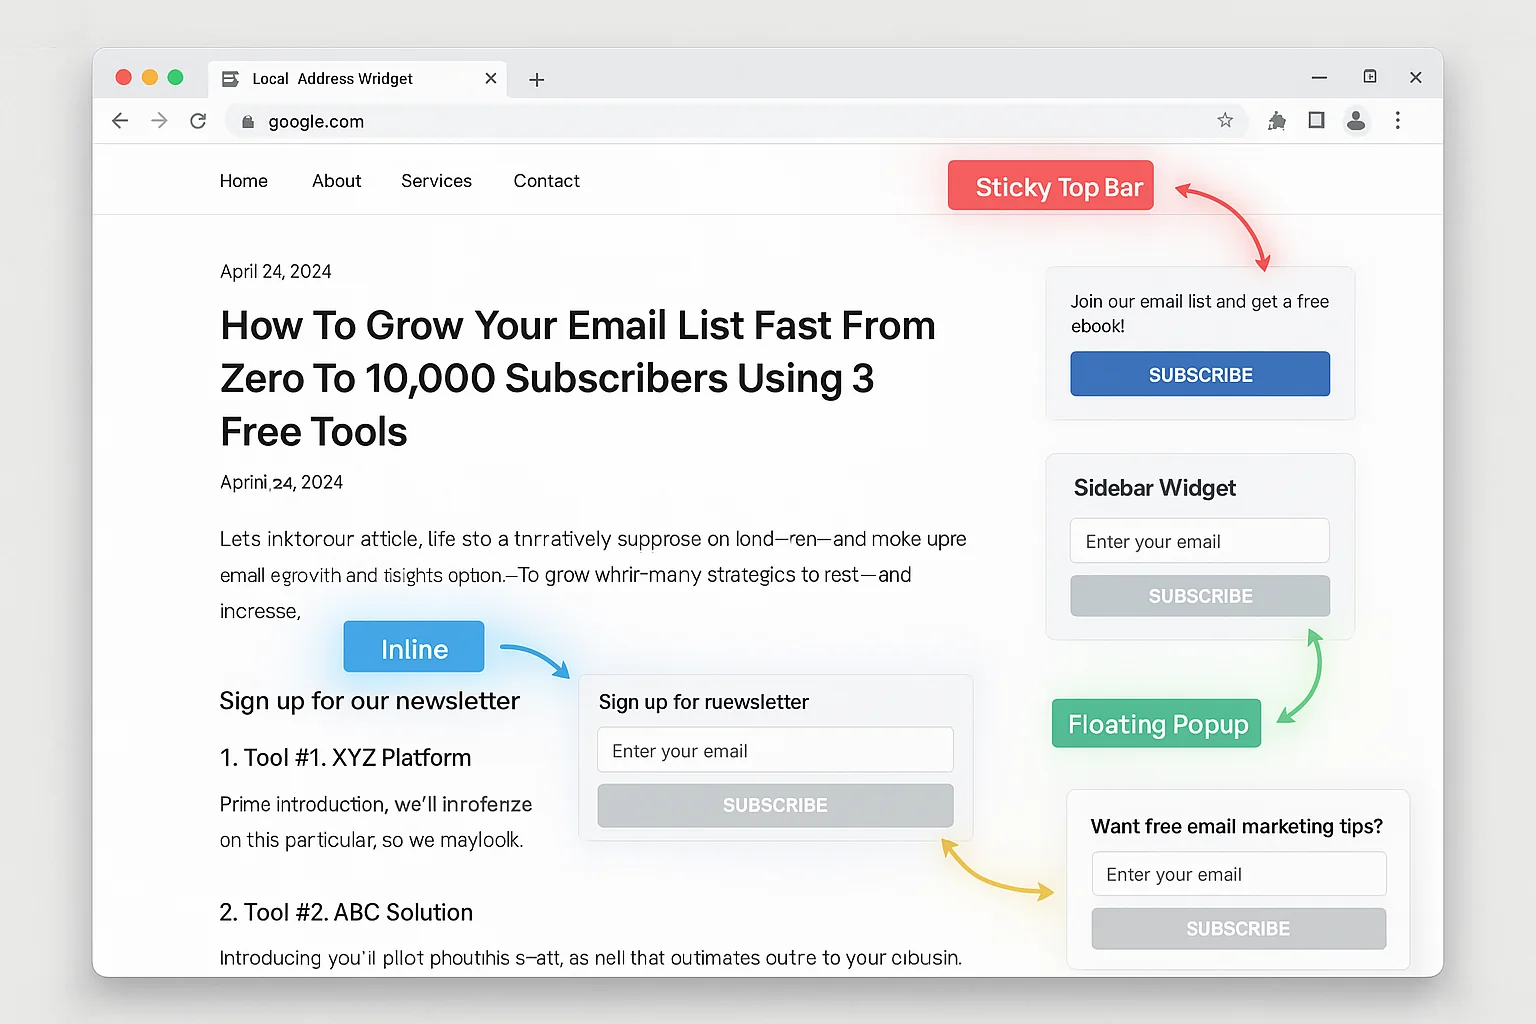
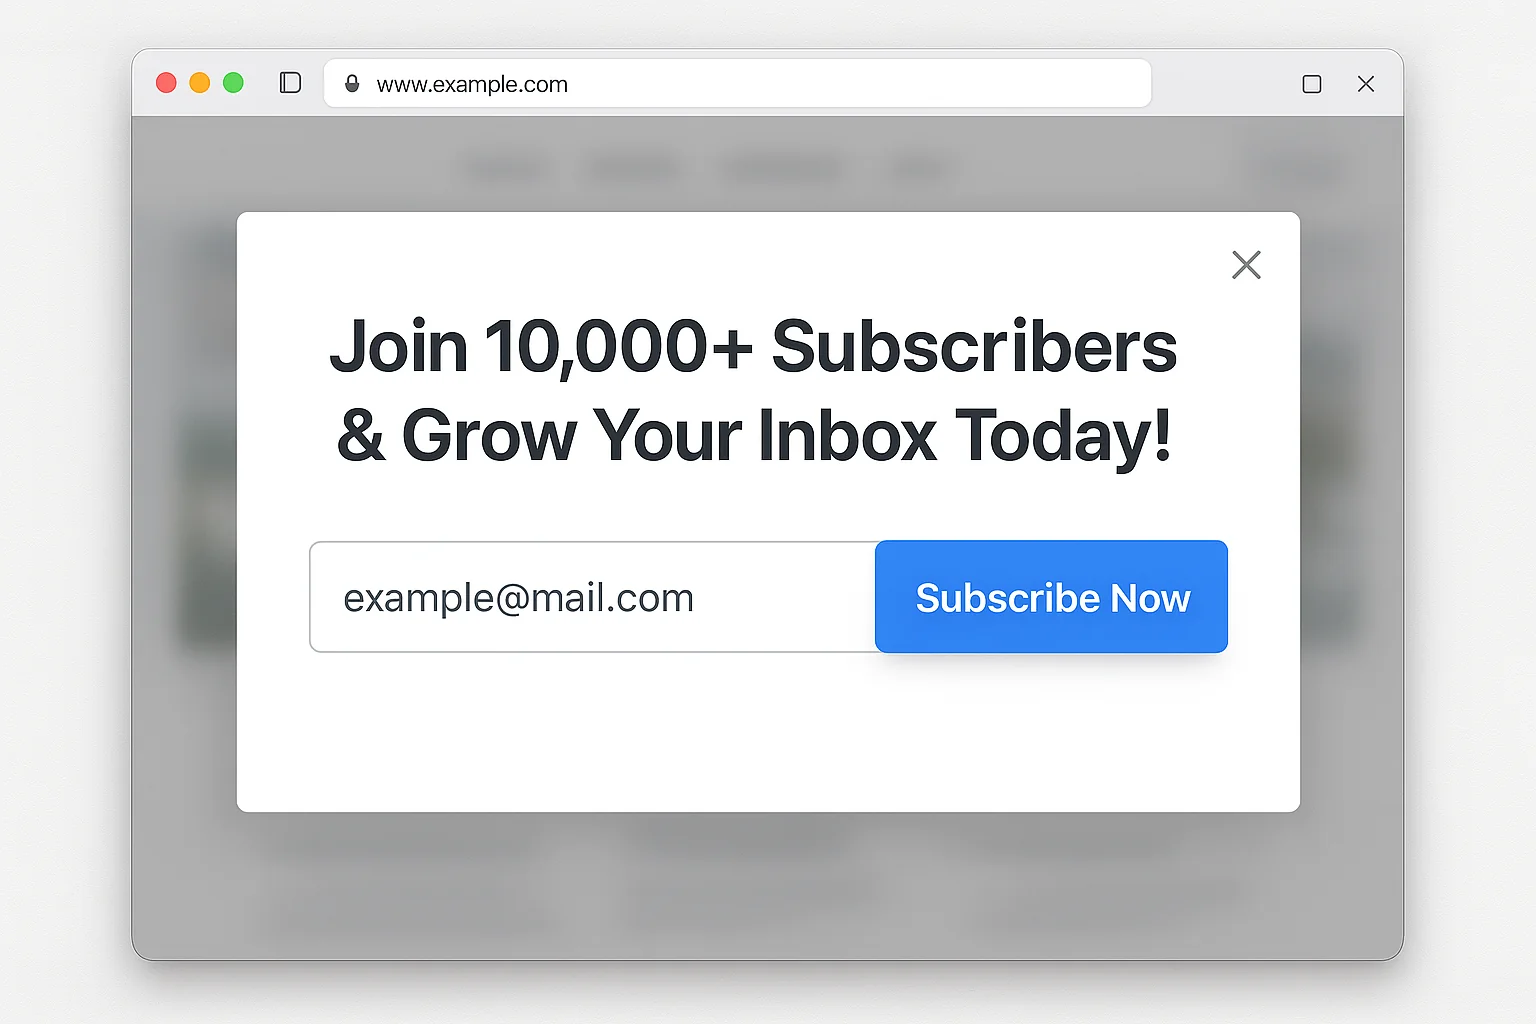
Tool #2: Welcome Mats (The Full-Screen First Impression)
A welcome mat is a full-screen overlay that appears when a new visitor first loads a blog post. It offers the same bonus upgrade as the click trigger, but in a format that is impossible to ignore.
Here is the exact configuration that works:
- Display on desktop only. Google can penalize mobile interstitials that block content, so keep welcome mats desktop-exclusive.
- Target your top 50 organic posts only. Check Google Analytics (Behavior > Site Content > All Pages) and add welcome mats to your highest-traffic pages. Do not blanket your entire site.
- Exclude returning email subscribers. Set a rule that hides the mat for anyone clicking through from your email campaigns. They are already on your list. Showing them an opt-in form is annoying.
- Match the offer to the content. A generic “Subscribe to our newsletter” mat converts terribly. A mat that says “Free Download: The Complete Checklist From This Post” converts much better.
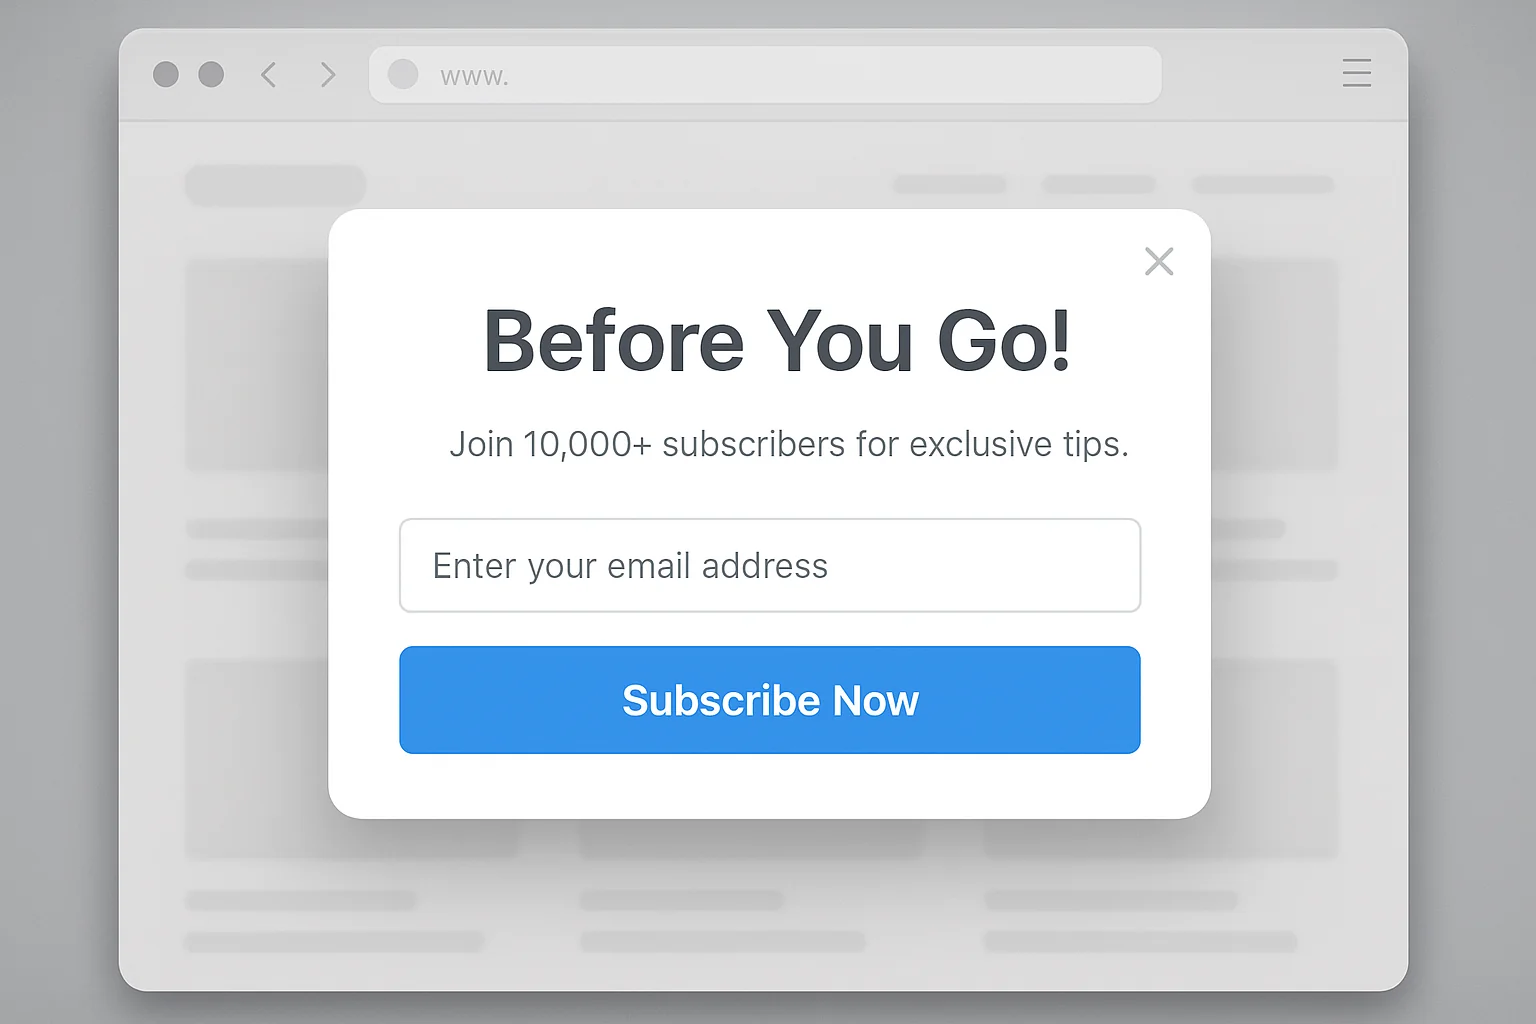
Tool #3: Exit-Intent Popups (The Last Chance Recovery)
Exit-intent technology detects when a visitor’s cursor moves toward the browser’s close button and triggers a popup at that exact moment.
This is your safety net. The visitor has already consumed your content. They got value. They are about to leave. The exit popup gives them one last reason to stay connected.
Here is how to configure exit popups for maximum conversion:
- Target your top 20 organic posts. Same process as welcome mats, but focus on the top 20 instead of 50.
- Change the headline copy. Welcome mats say “Get Your Free Bonus.” Exit popups say “Before You Go!” or “Wait, Don’t Miss This.” The copy needs to match the behavior of the visitor (leaving, not arriving).
- Same bonus upgrade as the click trigger and welcome mat. Consistency matters. The visitor may have seen the click trigger and ignored it. The exit popup gives them a second chance with the same offer, just framed differently.
- Set a frequency cap. Show the exit popup once per visitor per 30 days. More than that and you are training people to hate your website.
Why These 3 Tools Work Together
Each tool catches visitors at a different stage of engagement.
Click triggers capture high-intent readers who are actively engaged with your content. These are your best subscribers because they chose to interact.
Welcome mats capture new visitors before they even start reading. Some of these visitors would have bounced after 10 seconds. The mat converts them before they leave.
Exit popups catch everyone who slipped through the first two nets. The visitor consumed your content, ignored the click triggers, scrolled past the welcome mat, and is about to leave. The exit popup is the last play.
Together, these three tools create a layered capture system that touches every visitor at least once, and the most engaged visitors up to three times, without feeling spammy.
The takeaway: One tool is good. Three tools working in layers are POWERFUL. Click triggers capture high-intent readers, welcome mats capture new arrivals, and exit popups catch everyone else. That is how you go from 3,000 to 10,000 emails per month.
Your Zero-Budget Email List Setup Guide
You can set up this entire system in one afternoon with $0. Here is exactly what to do:
Step 1: Choose Your Tool
You need a popup and email capture tool. These are the best free options:
- BDOW (formerly Sumo): Free tier includes popups, welcome mats, click triggers, and exit-intent. This is the tool referenced throughout this article. It is the most battle-tested option.
- OptinMonster free alternatives (like OptiMonk): Free tier with gamification options including spin-to-win wheels.
- Mailchimp: Free tier includes basic popup forms that integrate directly with your email list.
For this guide, BDOW is the recommended choice because it includes all three tools (click triggers, welcome mats, exit popups) on the free plan.
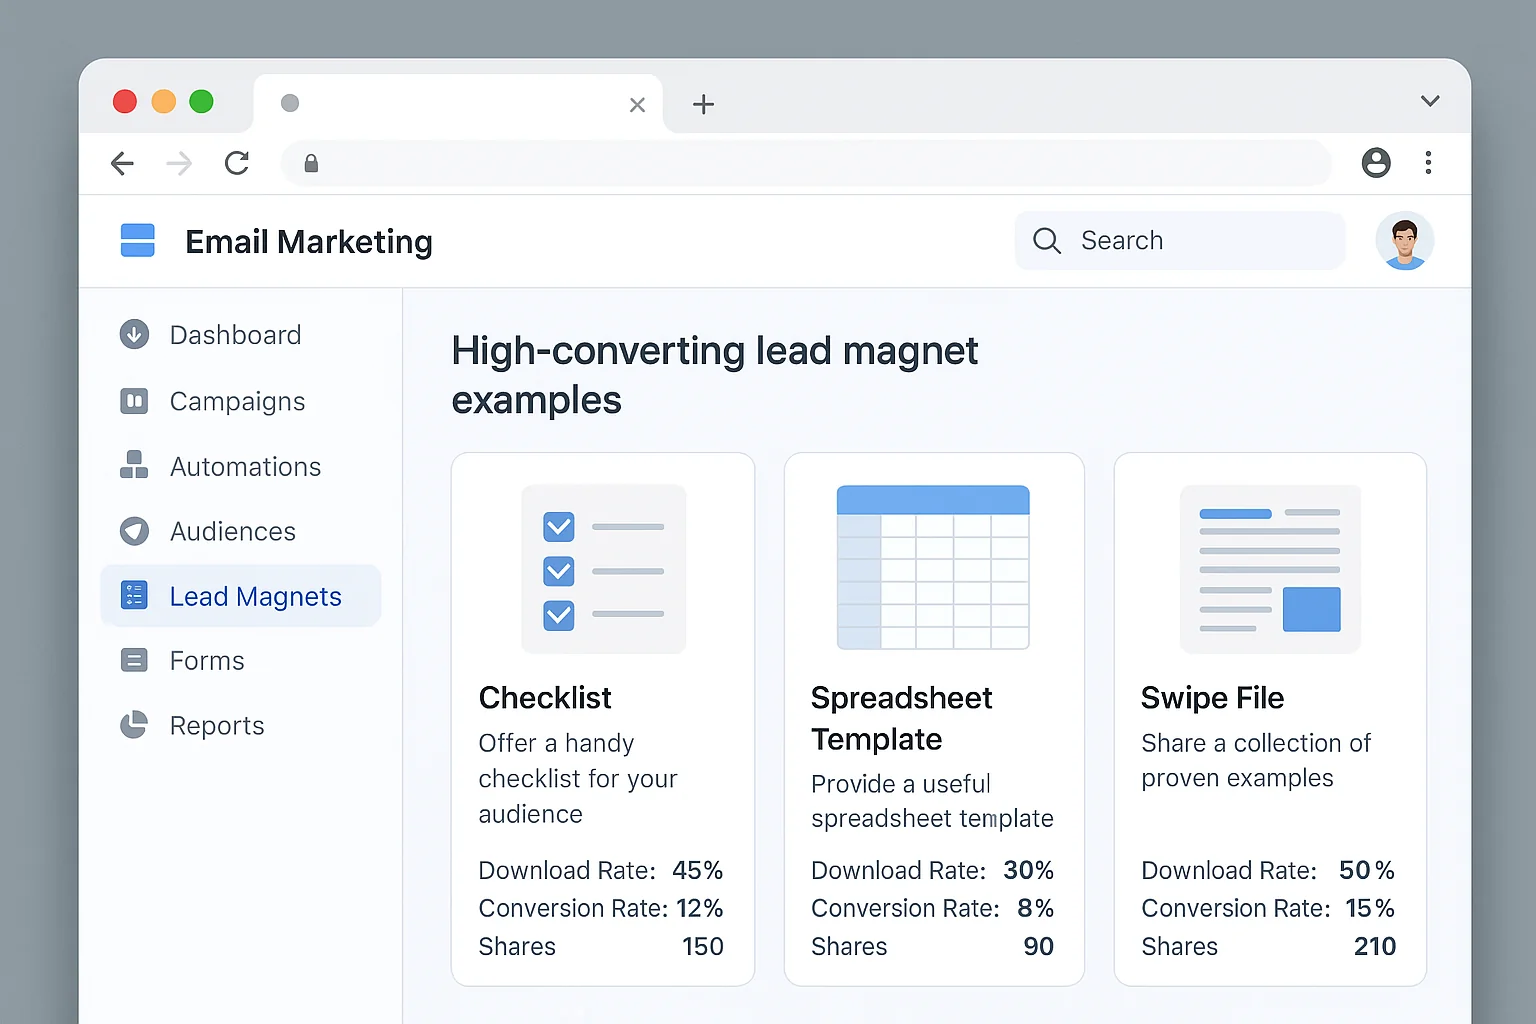
Step 2: Create Your Lead Magnet
Your lead magnet is the bonus upgrade you offer in exchange for an email address. The BEST lead magnets are directly related to the content the visitor is already reading.
Here is a formula that works for any niche:
Take the core lesson of your blog post and turn it into a downloadable format.
If your post is “7 Ways To Write Better Subject Lines,” your lead magnet is a PDF checklist titled “Subject Line Checklist: 7 Tests To Run Before You Hit Send.”
If your post is “How To Set Up Google Analytics 4,” your lead magnet is a step-by-step setup worksheet.
The lead magnet does not need to be a 40-page ebook. A one-page checklist, a spreadsheet template, or a swipe file converts just as well (often better) because the perceived effort to consume it is lower.
You do not need a unique lead magnet for every blog post when you are starting from zero. Create one “universal” lead magnet that applies to your entire niche (like a resource list, toolkit, or cheat sheet) and use it across all your content. Upgrade to post-specific lead magnets as your traffic grows.
Step 3: Set Up Your Click Triggers
Here is the exact configuration.
- Create a new “Click Trigger” form in your popup tool.
- Design the popup that appears when the trigger is clicked. Keep it simple: headline, one sentence of copy, email field, submit button.
- Set the popup headline to: “Get Your Free [Lead Magnet Name]”
- Set the submit button text to something specific like “Send Me The Checklist” (never use “Submit”).
- Copy the click trigger link.
- Paste it into your blog post in all four positions: under the headline, in the top 30%, in the bottom 30%, and inside the core content.
The anchor text for your click trigger should match the lead magnet. Example: “Download the free Subject Line Checklist here” with “here” being the trigger link.
Step 4: Set Up Your Welcome Mat
- Create a new “Welcome Mat” form in your popup tool.
- Set the headline to match your lead magnet: “Free Download: [Lead Magnet Name]”
- Add one sentence explaining what the visitor gets: “A one-page checklist with every test from this post. Enter your email below.”
- Set display rules:
- Device: Desktop only
- Pages: Your top 5-10 traffic pages (check Google Analytics)
- Visitor type: New visitors only
- Exclusion: Anyone arriving from an email campaign link
- Set a dismiss button that is clearly visible. Forcing visitors to hunt for the close button tanks your brand trust.
Step 5: Set Up Your Exit-Intent Popup
- Create a new “Exit Popup” form.
- Set the trigger to “Exit intent” (cursor moving toward browser close/back button).
- Set the headline to: “Before You Go! Grab Your Free [Lead Magnet Name]”
- Same lead magnet, same email field, same submit button.
- Set display rules:
- Pages: Your top 5-10 traffic pages
- Frequency: Once per visitor per 30 days
- Exclusion: Anyone who has already submitted any form on your site
Step 6: Add Gamification (The Conversion Multiplier)
Once your basic three-tool stack is running, upgrade one of your popups to a gamified format.
The easiest upgrade: replace your exit-intent popup with a spin-to-win wheel.
Tools like OptiMonk and Privy offer free spin-to-win wheel templates. Set your prize tiers (10% off, 15% off, 20% off, free shipping) and require an email to spin.
This single change can take your exit popup conversion rate from 3-5% to 10-20%. On 1,000 monthly visitors, that is the difference between 30 new subscribers and 100+ new subscribers from one popup alone.
Step 7: Track, Test, Optimize
Set a calendar reminder for 30 days after launch. Check these numbers:
- Popup conversion rate by tool. Which of the three tools is generating the most subscribers?
- Popup conversion rate by page. Which blog posts convert the best? Double down on those topics.
- Unsubscribe rate. If your unsubscribe rate spikes, your lead magnet promise does not match your email content. Fix the mismatch.
After 30 days, make one change at a time. Test a new headline. Try a different lead magnet. Adjust the popup timing from 10 seconds to 15 seconds. Small tweaks compound into big gains over months.
The takeaway: This entire system costs $0 and takes one afternoon to set up. The only thing separating you from 10,000+ monthly subscribers is the decision to start.
Why This Works (And Why Most “Grow Your List” Advice Fails)
Most email list building advice tells you to “be consistent” and “provide value.” That advice is accurate. It is also useless because it is not actionable.
Here is why the three-tool stack works where vague advice fails.
It removes reliance on visitor motivation. A passive footer form requires the visitor to want to subscribe badly enough to scroll to the bottom of your page, find the form, fill it out, and click submit. That is four friction points. A click trigger, welcome mat, or exit popup puts the offer directly in the visitor’s path. You are not hoping they find you. You are meeting them where they already are.
It matches the offer to the moment. A welcome mat hits visitors when curiosity is highest. A click trigger fires when engagement is deepest. An exit popup catches visitors at the last possible second. Each tool is optimized for a specific psychological moment in the visitor journey.
It converts traffic you are ALREADY getting. You do not need more traffic to grow your email list faster. You need to convert more of the traffic you have. Going from a 0.5% footer form conversion to a 3.09% popup conversion rate (the average) means 6x more subscribers from the same traffic. Add gamification and you are looking at 12-20x more subscribers.
It compounds. Every subscriber you capture today increases your list’s reach, your content’s distribution, and your site’s return visitor rate. Those returning visitors see your popups again (if they haven’t already subscribed), and the cycle accelerates.
This is why the BDOW blog went from 3,000 to 10,000 emails per month. They did not buy more traffic. They did not run ads. They set up three free tools, optimized them over four months, and let compounding do the rest.
The takeaway: You do not need more traffic, a bigger budget, or a better strategy. You need to capture more of the visitors you already have. Three free tools, properly configured, will do that starting today.
The 30-Day Growth Sprint: Your First Month From Zero
If you are starting from absolute zero (no list, no traffic, no budget), here is your first 30 days.
Week 1: Publish 2 pieces of content targeting long-tail keywords in your niche. Set up your BDOW (or equivalent) account. Create one universal lead magnet. Install click triggers on both posts.
Week 2: Add a welcome mat to both posts. Set up your exit-intent popup. Share both posts in 2-3 relevant online communities (Reddit, Facebook groups, niche forums) where your audience hangs out. Do not spam. Provide genuine value and link to your content where relevant.
Week 3: Publish 1 more piece of content. Add click triggers. Check your popup analytics. Identify which popup is converting best and optimize the others to match its style.
Week 4: Review your numbers. Even with modest traffic of 200-500 monthly visitors, you should have 6-25 subscribers from popups alone. Replace your exit popup with a gamified version. Share your content in 2-3 more communities.
That sounds small. 6-25 subscribers.
But remember the compounding math from earlier. Those 6-25 subscribers this month become 50+ in month 3, 100+ in month 6, and 500+ in month 12 as your traffic grows and your conversion rates improve through testing.
The only wrong move is waiting until you have “enough traffic” to start capturing emails. There is no minimum traffic threshold for email capture. A popup that converts 3% on 100 visitors gives you 3 subscribers. A popup that converts 3% on zero visitors gives you zero. Start with what you have.
Now go set up your first popup. Your future email list is waiting.